Addressing Process for Greenfield Subdivision
A greenfield subdivision is built on land that has not been developed before, such as former farmland or open land at the city’s edge. Its lots, and often its streets, are new, so there are no existing addresses to follow.
This post introduces greenfield-addressing, a workflow that numbers the lots of a new subdivision from just two GIS layers, with explicit rules, and asks the user only when the rules cannot decide. Part 1 explains the idea and the algorithm; Part 2 implements it with the QGIS Python API (PyQGIS). All figures use a small synthetic subdivision.
Part 1 — The idea
Two inputs, one unit of work
The process needs only two layers:
- Survey parcels: the lot polygons of the subdivision plan.
- Street segments: street centrelines, each with a
street_name.
The segments that share a street name are merged into one street line. Its direction is the street’s direction, and the distance along it from its start is a point’s measure, so the segments may be digitised either way and need no measure attributes.
Both layers must be in the same projected CRS in metres (UTM, for example): every length, area and tolerance below is in the layer’s own units, and in a geographic CRS they would be degrees.
Everything else (the frontage of every lot, address points, the search rays, a numbering coefficient per street) is produced by the process.
A person numbering a street works one side at a time, from a known number. The process does the same: each run takes a seed lot, its seed number and the street, and addresses one side of that street. The other side is a second run with its own seed.
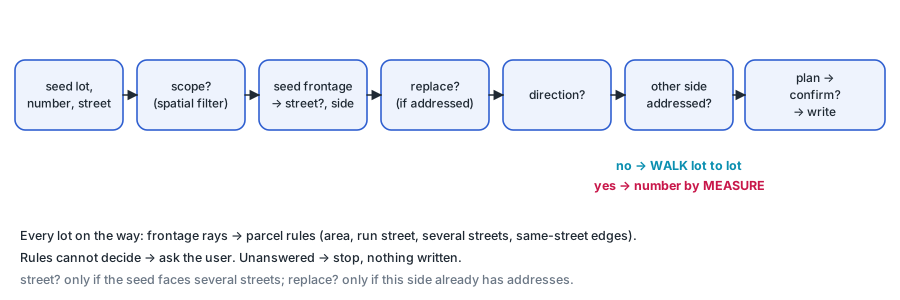
Step 1: the seed lot — its front and its side
A run starts by processing the seed lot: which edge is its front, which street that front faces, and which side of the street it is on. Every later lot goes through the same tests.
Which edge is the front? Ray casting
A lot’s address belongs to the street it faces. To find it, the parcel boundary is first reduced to meaningful edges, then a ray is cast from each edge.
Edges. Survey rings carry many vertices: a curved front can be dozens of short pieces (especially when the geometry library has no true circular curves, which is common with web GIS data), and corners leave small leftovers. Consecutive pieces are merged into one edge while the turn between them is small (default under 10°), or moderate next to a very short piece (default under 45° next to a piece shorter than 2 m). These thresholds are parameters and can be tuned to the data.
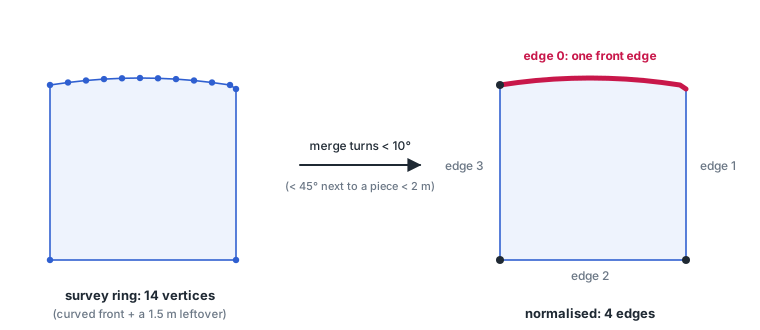
Frontage rays. From the midpoint of every edge, a ray is cast perpendicular to the edge, away from the lot’s centroid, up to a maximum length (default 200 m, a parameter). The edge is a frontage only if the first thing the ray hits is a named street. A neighbouring lot, an unnamed street, or nothing at all means the edge is not a front.
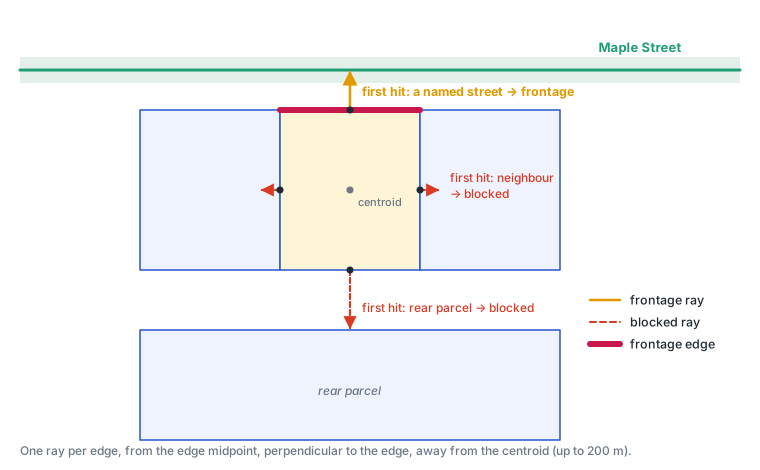
The “first hit” test is what makes the method robust: a rear edge that eventually reaches a street 60 m away is still rejected, because a lot is in the way.
Parcel rules
Most lots have exactly one frontage. The rest are settled by rules, applied to every lot in this order. The thresholds are parameters of the code; the values given are defaults and can be tuned to the local lot pattern:
- Large parcels (over an area threshold, default 1600 m²) are usually parks, reserves or future development parcels, not house lots: skipped.
- No frontage on the run’s street, and frontage on at most one other street: skipped.
- Frontage on more than one street. If the lot is the seed, the user picks the street; the front edge on that street is then found by rule 4, like any other lot. Any other lot in the run (a lot found as the next parcel, Step 2):
- faces the run’s street and another street whose frontage is within a set angle of it (default under 45°): a through-lot backing onto another road, addressed on the run’s street;
- faces them at that angle or more: a corner lot, addressed on the street with the shorter frontage (each street’s longest edge compared), since the narrow side is the front and the long side the flank. If that is not the run’s street, the lot is skipped and counted as a gap; if the two lengths are within a set ratio of each other (default 10%), the user is asked;
- does not face the run’s street but faces several others: the run stops there.
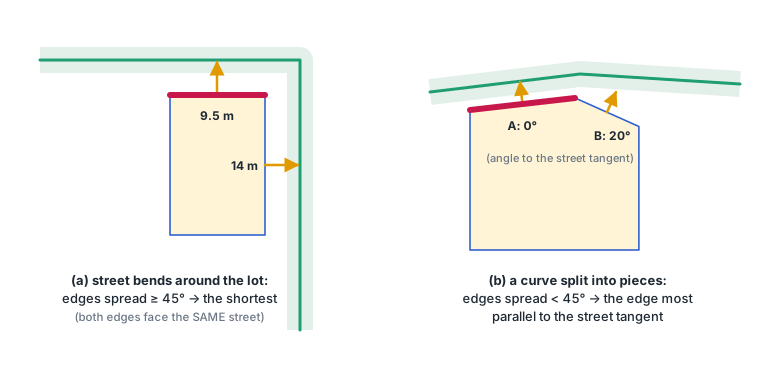
- Several edges on the same street. If they spread widely (default 45° or more), the street bends around the lot and the shortest edge is the front. Otherwise the front is a curve split into pieces, and the piece most parallel to the street is the front. An exact tie is asked.
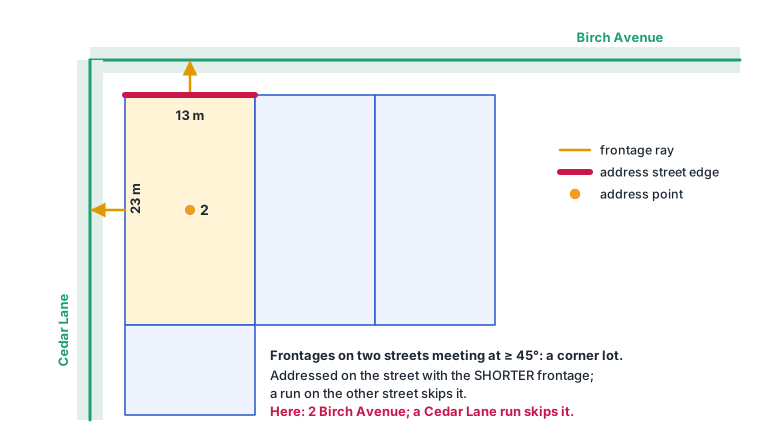
Which side of the street? A cross product
Odd and even numbers belong on opposite sides, so each frontage needs a side. Take the street segment a → b nearest to the frontage midpoint p (in the street line’s direction). The sign of the 2D cross product decides:
cross = (bx − ax)·(py − ay) − (by − ay)·(px − ax) > 0: left, < 0: right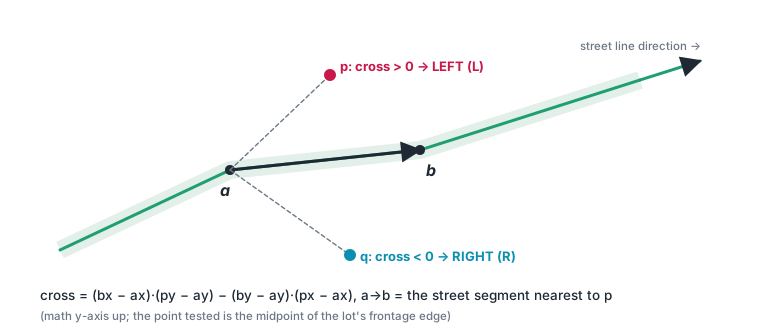
Using the nearest segment, not the whole street, keeps the test correct on curved streets. Floating-point coordinates almost never give exactly 0, so a point on or very near the line has no side and is treated as undecided. |cross| is the area of the parallelogram spanned by a → b and a → p, so dividing it by the segment length gives the point’s distance from the line, and the test is |cross| / |ab| < ε with ε a distance tolerance (default 1 cm, a parameter).
Step 2: finding the next parcel
Once the seed is processed, the run moves along the street one lot at a time. The next parcel is found from the current one:
- From the current lot, take the point where its frontage ray meets the street and the street’s tangent there.
- Cast a search ray from the lot’s centroid along the tangent, in the chosen direction.
- The first lot the ray enters that passes the parcel rules is the next lot. If it is on the other side of the street, or nothing is found within the ray length (default 200 m), the side is done.
Step 3: the first side — walk from lot to lot
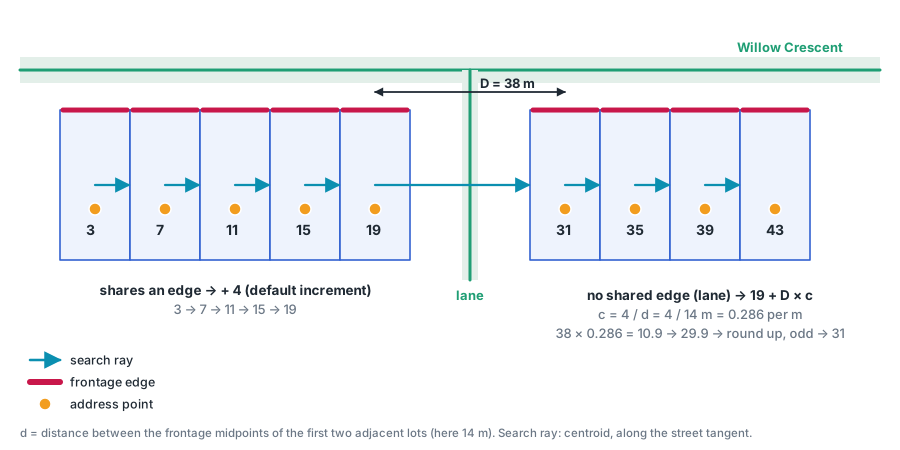
The first side of a street is numbered by walking: each next lot found in Step 2 is numbered from the current one:
- it shares an edge with the current lot (at least 0.5 m of common boundary): current + conventional_increment (default 4, a parameter);
- otherwise (a lane, a walkway, a skipped parcel in between): current + D × c, rounded up to the same parity, where
Dis the distance between the two frontage midpoints.
c is the street’s coefficient in numbers per metre, measured from the run itself: c = conventional_increment / d, with d the frontage-midpoint distance of the first two adjacent lots. A gap therefore reserves as many numbers as the missing frontage would have used, at this street’s own lot width.
Step 4: the other side — number by position along the street
If the second side were walked independently, the two sides could drift apart (odd 35 facing even 48). So the second side is numbered against the first, by measure, the distance along the street line:
- Every address on the first side and every candidate lot on this side is placed on the street at the measure where its frontage ray hits.
- In measure order from the seed, each lot gets the smallest number of its parity that is above the previous number on this side and above every opposite number behind it, while staying below every opposite number ahead of it.
- If no such number is left (the numbers up to the next opposite address are used up), the side stops there, and the remaining lots stay unnumbered for review rather than being squeezed in.
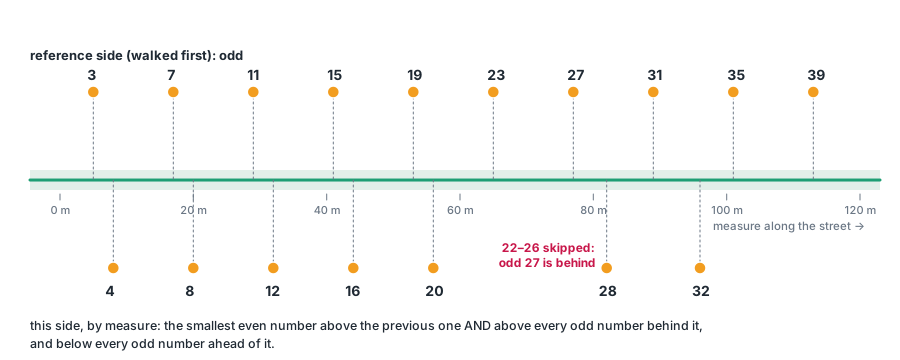
Projected onto the street, all numbers then increase in one direction on both sides.
Step 5: when the rules cannot decide, ask
A process that silently guesses is worse than one that asks. Whenever the rules run out, the code asks a precise question:
| Question | When | Default |
|---|---|---|
scope |
always first: only parcels in the current spatial filter are affected | |
seed_number |
the seed lot has no seed number yet | |
street |
the seed lot has frontage on more than one street | |
replace |
this side of the street already has addresses | no |
direction |
which way the numbers run along the street | forward |
street:<lot> |
a corner lot’s two frontages are within 10% of each other in length | |
tie:<lot> |
two edges tie exactly on the edge rules | |
coefficient |
a gap appears before the coefficient is known | |
confirm |
write the planned addresses |
A run also respects a scope: only lots inside the user’s spatial filter are addressed or replaced. That is how a user keeps a run away from lots already addressed from another street. Lots outside the filter still block frontage rays, because a lot does not stop being in the way just because it is filtered out.
Part 2 — Implementing it with the QGIS API
The implementation is a single file, greenfield_addressing.py, with no dependency other than PyQGIS, so it runs in the QGIS Desktop Python console or headless, and the same structure can be ported to ArcPy. A test script builds a synthetic subdivision and checks every rule. The snippets below are simplified from the module.
Layers
import math
from qgis.core import (QgsExpression, QgsFeatureRequest, QgsGeometry, QgsPointXY,
                       QgsSpatialIndex, QgsVectorLayer)

parcels = QgsVectorLayer("work/survey_parcels.gpkg", "Survey parcels", "ogr")
streets = QgsVectorLayer("work/street_segments.gpkg", "Street segments", "ogr")
Inputs are read only. The addresses go to their own layer in a GeoPackage, created on demand; every ray cast is returned as a memory layer for review.
Edges: merging small turns
1 | |
The ring is the outer ring of the parcel, with true curves converted to straight segments and, for a multipolygon, only the largest part kept:
def outer_ring(geometry):
    g = QgsGeometry(geometry)              # copy: the input layer stays untouched
    g.convertToStraightSegment()
    if g.isMultipart():
        largest = max(g.asMultiPolygon(), key=lambda p: QgsGeometry.fromPolygonXY(p).area())
        return largest[0]
    return g.asPolygon()[0]
Frontage rays: first hit wins
1 | |
Starting the ray 1 cm outside the edge makes a neighbour that shares the edge the first hit, so shared boundaries are rejected without special cases. The spatial index (for parcels) and the bounding-box filter (for streets) keep each ray to a handful of candidates; the real code also keeps the clipped ray geometry so every ray can be drawn for review.
Street line, side and tangent
mergeLines joins a street’s segments into the street line, whatever way each was digitised:
def street_line(name):
    request = QgsFeatureRequest().setFilterExpression(f"street_name = {QgsExpression.quotedValue(name)}")
    line = QgsGeometry.unaryUnion([f.geometry() for f in streets.getFeatures(request)]).mergeLines()
    if line.isMultipart():
        raise ValueError(f"{name}: segments do not join into one line (gap or branch)")
    return line
On the street line, closestSegmentWithContext returns the vertex after the closest segment, which gives the local segment a → b for both the side test and the tangent:
1 | |
The walk: search ray, shared edge, numbering
1 | |
With shared_edge_length(...) >= 0.5 the step is +conventional_increment (default 4); otherwise next_number(current, D, c). The coefficient is c = conventional_increment / d from the first adjacent pair of the run, stored per street.
Measure and the other side
lineLocatePoint gives the measure, the distance along the street line:
def measure(line, point):
    return line.lineLocatePoint(QgsGeometry.fromPointXY(point))
The numbering of the other side is then plain Python over (measure, number) pairs:
1 | |
Asking, planning, writing
Questions go through a small Prompter class: the base class looks up preset answers, falls back to the default, and logs every answer; a ConsolePrompter reads the terminal; a QgisPrompter opens QInputDialog.getItem / getText. A front end for another platform implements the same single method, interactive.
forward = prompter.ask("direction", "Which way do the numbers run?",
                       {"forward": "towards the end of the street line",
                        "backward": "towards its start"},
                       default="forward") == "forward"
The run builds the whole plan first, prints it, asks confirm, and only then writes, through the data provider so that layers already open in QGIS Desktop see the change:
provider = addresses.dataProvider()
provider.deleteFeatures(replace)           # this side's old addresses, if confirmed
provider.addFeatures(features)
Running it in QGIS
With the project open, put greenfield_addressing.py on the Python path and, in the Python console:
1 | |
Each run prints the reason for every number (“shares an edge: 15 + 4 = 19”; “no shared edge: D = 38.0 m, D x c = 10.9 -> 31”) and returns every ray it cast as a layer, so the result can be checked on the map, not just in a log. All thresholds are fields of ga.Settings, passed as settings=ga.Settings(max_lot_m2=2000), for example.
Limits
- Greenfield only. The process assumes no addresses on the street except those its own runs created. Infill (fitting a new lot between existing numbers, such as 25A) is out of scope.
- Run order. The denser side should be walked first; the other side follows by measure.
- One line per street. The segments of a street must join into one line. A street with a gap, or a branch carrying the same name, is refused and has to be split into parts first.
- Thresholds. All defaults (ray length, area, angles, tolerances,
conventional_increment) are starting values and need review on more subdivisions.
Takeaway
Numbering a new street by hand is full of small judgements, but most of them are rules that can be written down: which edge is the front, which lots to skip, how many numbers a gap is worth, how the two sides stay in step. Casting rays answers the geometric questions, the measure along the street keeps the two sides aligned, and whatever is left is asked as a precise question. Rules where possible and questions where not: that split makes the process both automatic and trustworthy.